
Invoice Overview
In Contractors Cloud, an Invoice bills your customer for work on a Job. Every invoice belongs to one of the Job's Contracts, and its lines, payments, credit memos, and refunds roll up into the Job's financials automatically.
Invoices give you accounts-receivable tracking per Job: a line-level approval workflow (so estimates, supplements, and change items can sit on the invoice before they are billable), a running balance that updates as payments and credits are applied, and QuickBooks sync without double entry.
Quick start — create an invoice
- Open the Job and go to the Contract's invoice list (see Contract Invoice & Transaction Views), then create a new invoice.
- Fill in the Invoice # (required) and the Details fields. Set the Invoice Date to make it a live invoice — or leave the date blank to keep it as a Sales Order (see below).
- Add Invoice Lines — type them in the quick-add row, or import them from an Estimate, an Invoice List, or another invoice.
- Set each line's Item Status. Your goal is for every line to end up Billable (counts and bills) or Denied (excluded).
- Apply a Tax rate if any lines are taxable.
- Save. When money comes in, use Receive Payment; if you use QuickBooks, close the invoice with Sync & Close.
Invoices vs. Sales Orders
An invoice without an Invoice Date is a Sales Order — a pre-billing stage of the same document. Sales Orders are labeled in red throughout the app and always show the status Pending.
To convert a Sales Order into a live invoice, simply enter its Invoice Date. Everything on the document (lines, comments, settings) carries over — it is the same record. Sales Orders cannot be pushed to QuickBooks with the Sync Invoice button; whether they sync at all depends on your company's QuickBooks settings (see QuickBooks Online).
Invoice Interface
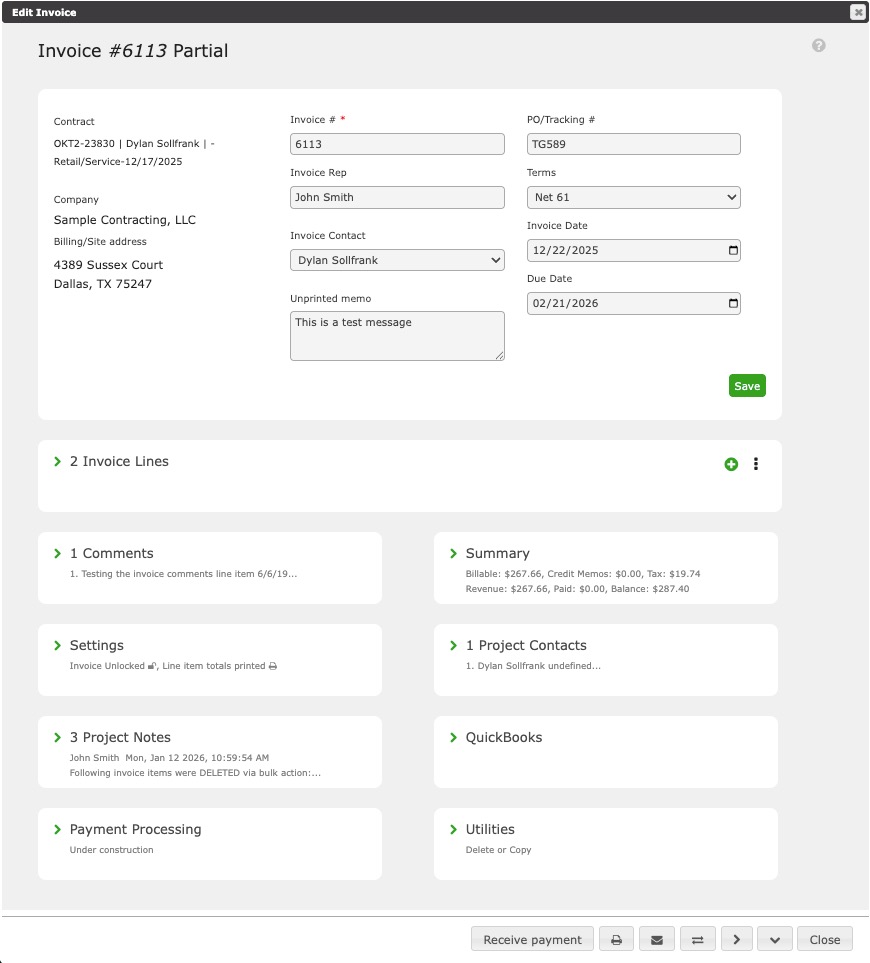
This is what a typical invoice looks like. The title bar shows the invoice number and its current status.
Details
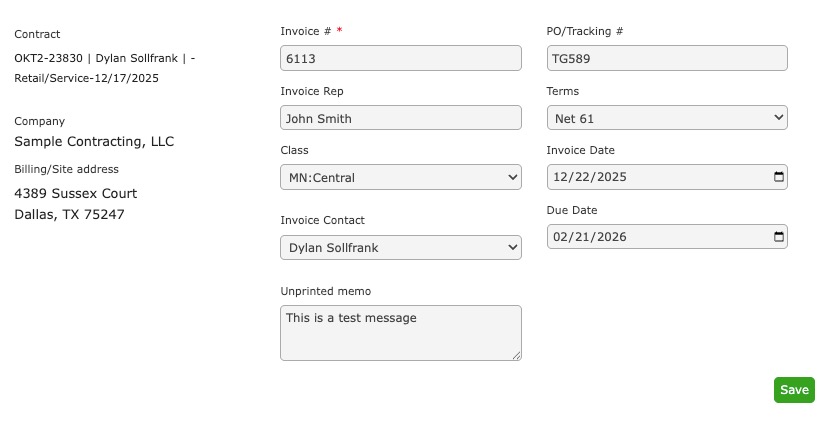
These are the high-level details for the invoice.
Invoice # (required)
The invoice number. Each invoice must have a unique number. Automatic invoice numbering can be configured in Invoice Settings within Company Settings (permission required).
PO/Tracking #
An optional purchase-order or tracking number.
Invoice Rep
The User who takes credit for the invoice. Defaults to the User holding the Direct Responsibility role on the Project Team.
Class
The Class for the invoice. If you change it, you'll be offered the option to apply the new Class to all invoice lines. See Class Tracking.
Invoice Contact
The Contact the invoice is addressed to. The options are the Project's Contacts.
Terms
The payment terms (for example, Net 30). Choosing terms sets the Due Date automatically from the Invoice Date. Payment Terms are managed in Company Settings (permission required).
Invoice Date
The date the invoice is issued. This starts the billing cycle and drives the Due Date. Leave it blank and the document remains a Sales Order.
Due Date
The deadline for payment. An unpaid invoice past this date shows as Overdue.
Unprinted memo
An internal note that does not print on the invoice.
Invoice Lines
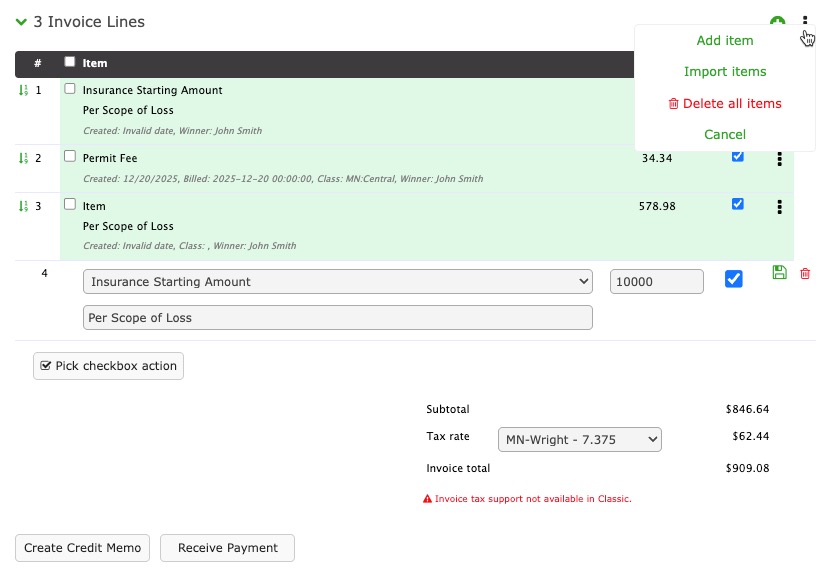
Invoice lines are the individual items being billed. Each line carries its own amount, dates, Class, status, and tax setting, and the lines sum into the invoice totals.
Add lines
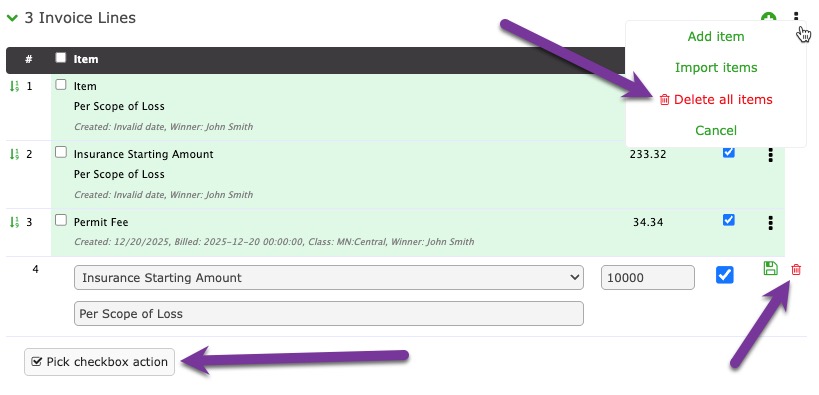
Add a line in the quick-add row at the bottom of the table, or with the green plus button. The kebab menu (⋮) also offers Add item, Import items, and Delete all items. Drag the handles to reorder lines.
Item
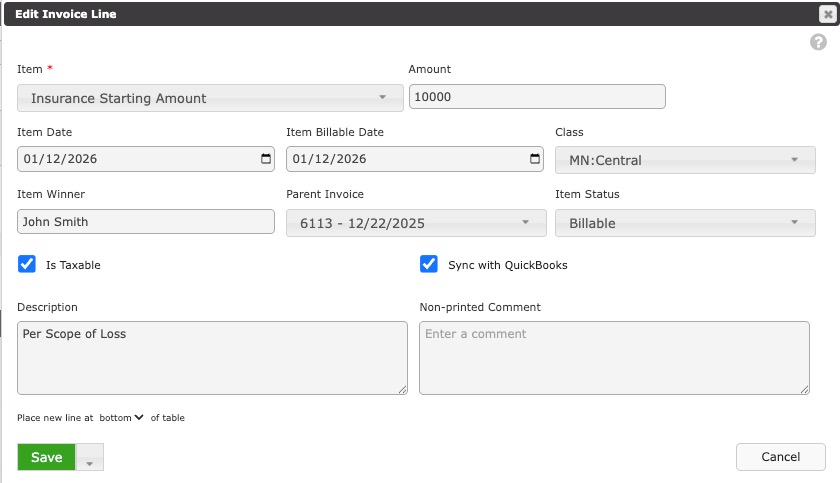
The invoice item, from the catalog managed in Invoice Items within Company Settings. Choosing an item fills in its default description, quantity, rate, and taxability.
Quantity/Rate
To show quantities and rates on invoices, enable Include Quantities and Rates within Invoice Lines in Invoice Settings within Company Settings.
Amount
The dollar amount for the line.
Item Date
The date the line was created or issued.
Item Billable Date
The date the line was marked Billable.
Class
The Class for the line. See Class Tracking.
Item Winner
The User who receives sales credit for the line. In invoice and sales reports this shows who actually sold what.
Parent Invoice
The invoice the line belongs to. Selecting a different invoice moves the line.
Item Status
Controls whether the line counts toward the invoice's sold total. Your goal is for every line to end up either Billable or Denied.
- Pending — shown on the invoice, but not yet counted as sold.
- Approved — counted as sold, but not ready to bill yet.
- Billable — counted as sold and ready to bill. Only Billable lines are included when the invoice syncs to QuickBooks.
- Denied — excluded from all invoice totals.
Is Taxable
If checked, the line contributes to the invoice tax total.
Sync with QuickBooks
Checked by default — the line is included when the invoice syncs to QuickBooks. Uncheck it to keep this line out of the QuickBooks copy.
Description
Text that prints with the line on the invoice.
Non-printed Comment
An internal comment that does not print.
Import lines
Lines can be imported from an Invoice List/template, an active Estimate, or another invoice.
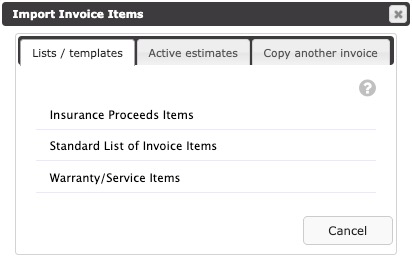
Invoice Lists are created in Invoice Items & Lists within Company Settings.
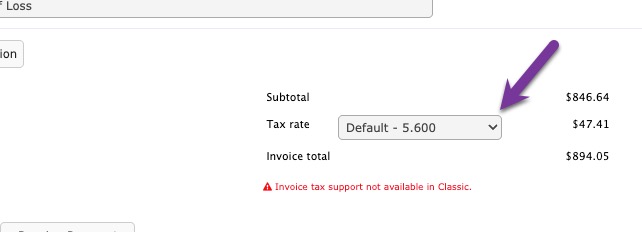
Apply tax
Choose the Tax rate below the line table; tax is calculated on the lines marked Is Taxable. Tax rates are managed in Company Settings — see Tax Codes (permission required).
Bulk actions and deleting
Delete a line with its trash icon, or select several lines and use Pick checkbox action to change status, Class, winner, or dates in bulk, or to delete the selection. Delete all items lives in the kebab menu.
Comments
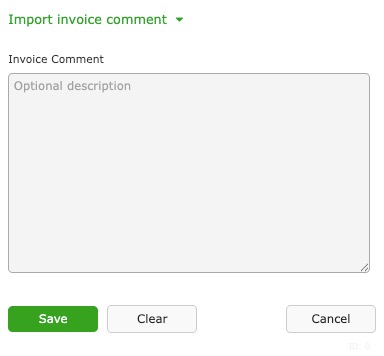
Invoice comments are the customer-facing notes that print at the bottom of the invoice — payment instructions, late-fee language, thank-you text. Add one with the green plus, edit or delete with the icons on each comment, and drag to reorder.
Reusable comment templates are managed in Invoice Settings within Company Settings; a template marked as the default is added to every new invoice automatically. You can also import a template onto an existing invoice:
If the invoice syncs to QuickBooks, its comments are combined and sent as the QuickBooks customer memo (one direction: Contractors Cloud → QuickBooks).
Summary
The financial summary for the invoice. Related transactions — Credit Memos, Payments, and Refunds — are created and accessed here with Create Credit Memo and Receive Payment.
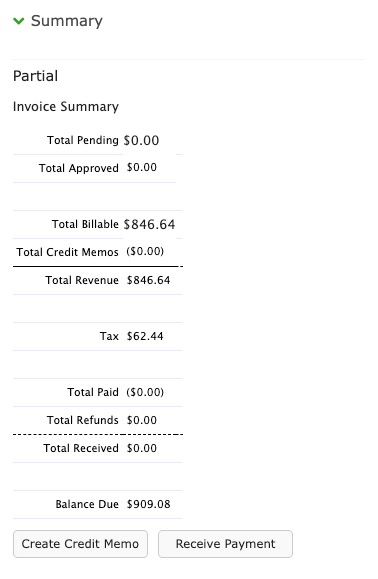
- Total Pending / Total Approved / Total Billable — line totals by Item Status.
- Total Credit Memos — credits issued against the invoice.
- Total Revenue — billable total less credit memos.
- Tax — sales tax on the taxable lines.
- Total Paid / Total Refunds / Total Received — payments applied, refunds issued, and the net received.
- Balance Due — what remains owed: revenue plus tax, minus what has been received, adjusted for refunds and credit-memo tax.
Invoice Status
The status shown in the invoice title and on the Contract's invoice list is calculated from the invoice's dates, lines, and balance:
- Pending — nothing is Billable yet, or the document is still a Sales Order (no Invoice Date).
- Open — there is a balance due, and the Due Date hasn't passed (or isn't set).
- Partial — partially paid; a balance remains.
- Overdue — a balance remains past the Due Date.
- Balanced — the billable total is fully offset without payments (for example, by credit memos).
- Paid — the balance reached zero through payments.
Settings
These are the settings for the invoice.
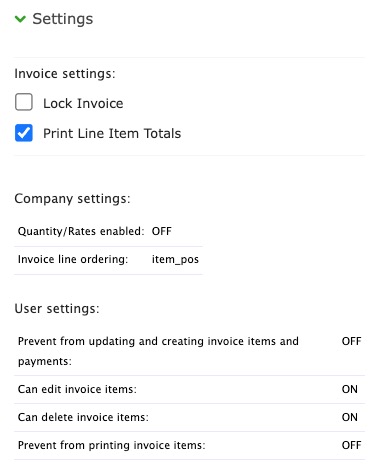
Lock Invoice
A locked invoice cannot be edited unless the User has the Executive, Invoice Edit, or Contract Approval permission.
Print Line Item Totals
Controls whether each line's total prints on the invoice. Uncheck it to print the lines with only a grand total at the bottom.
Print "Attention To" line on invoice
Shown when your company uses attention lines; controls whether the attention line prints for this invoice.
Company settings / User settings
Read-only references showing the Company Settings and User permissions that affect this invoice. Company items are changed in Invoice Settings within Company Settings; User items are changed in the User's permission settings.
Project Contacts
The Project's Contacts, shown here for reference.
Project Notes
Project Notes related to the invoice — including an audit trail of invoice changes such as bulk line actions.
QuickBooks
This section controls and shows the invoice's QuickBooks sync. The References panel lists the QuickBooks copy of the invoice (connection type and QuickBooks ID) once it has synced.
- Sync Enabled — checked by default. Uncheck it and this invoice will never be sent to QuickBooks.
- Sync Invoice — pushes the invoice to QuickBooks now. Not available for Sales Orders.
- Sync & Close — when sync is available, the invoice's close button reads Sync & Close: it syncs the invoice to QuickBooks and then closes the dialog. A Close without syncing option is available when you need to close without pushing changes.
Direction: Contractors Cloud exports the invoice to QuickBooks when you click Sync Invoice or Sync & Close — only Billable lines marked Sync with QuickBooks are included. Changes made in QuickBooks flow back only when your company's INVOICE SYNC setting is 2-way sync (QuickBooks Online). See QuickBooks Online and QuickBooks Desktop.
Printing & emailing
Use the printer button at the bottom of the invoice to generate the invoice PDF, and the envelope button to email it from the Job. All of a Contract's invoices can be printed together from the Contract's invoice list. Printing is unavailable to Users with the "Prevent from printing invoice items" permission.
Payment Processing
Currently under construction.
Utilities
This is where an invoice is copied, split, or deleted.
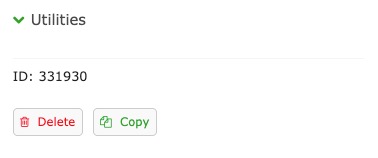
Copy duplicates the invoice within the Contract. Delete removes it — but an invoice with payments or credit memos applied cannot be deleted; remove those transactions first.
Split a Sales Order
Split appears on Sales Orders only. Use it when one Sales Order covers the whole job but you want to bill it in stages — a third now, a third mid-job, a third at completion.
Choose the Number of Splits (2 to 6). To bill uneven stages, edit the Split Percentages — they must total 100.00%. Left on their defaults the line items are divided evenly, so a three-way split of $1,200.00 gives $400.00 each; edit any percentage and each share is taken from the percentage instead. Item Status sets the status the new Sales Orders' lines carry.
This Sales Order keeps its line items and becomes the first split — its number gains a -1 suffix, and the new Sales Orders take -2 onward. Every line is divided across all the splits, and a Project Note recording the split is added to each one.
A Sales Order with payments or credit memos applied cannot be split; remove those transactions first.
Troubleshooting
"I can't edit the invoice."
The invoice is locked (Settings → Lock Invoice). Unlock it, or have a User with the Executive, Invoice Edit, or Contract Approval permission make the change.
"I can't delete the invoice."
Payments or credit memos are applied to it. Delete or reassign those transactions first, then delete the invoice.
"I don't see the Split button."
Split appears only on Sales Orders — documents with no Invoice Date — and only when the invoice is unlocked. Once you enter an Invoice Date the document is a live invoice and can no longer be split.
"I can't split the Sales Order."
Payments or credit memos are applied to it. Delete or reassign those transactions first.
"A line isn't counted in the invoice total."
Its Item Status is Pending or Denied. Set it to Billable (or Approved) for it to count as sold.
"The invoice isn't in QuickBooks."
Check, in order: the invoice's Sync Enabled box is checked; the lines you expect are Billable and marked Sync with QuickBooks; it isn't still a Sales Order; your company's INVOICE SYNC setting isn't disabled. Then push it with Sync Invoice or Sync & Close.
"QuickBooks blocked this invoice because it falls in a closed accounting period."
QuickBooks does not let connected apps post into a closed period. Enter the document directly in QuickBooks, or ask your bookkeeper to move the closing date.